Mastering Drupal Multilingual: Part 3 of 3
Part 3 of the "Mastering Drupal Multilingual" blog series provides site building and front-end tips and techniques to improve the multilingual experience for both editors and end-users.
Previous posts in this series covered planning and budgeting for multilingual, as well as the process for installing the modules needed and the basics of content, configuration and interface translation. If you missed posts one or two, you may want to read those posts before proceeding.
As we noted in Mastering Drupal 8 Multilingual: Post 2 of 3, installing the Multilingual modules, enabling content translation and setting the configuration translation is really all you need to do in order to translate your site.
However, the translation experience does leave a few things still to be resolved:
- Views will show duplicate results for translations.
- It is difficult to know what language the site is in on the admin side.
- Interface translations can affect content edit forms to the point where it is nearly impossible to know which field you are editing.
Views translation duplicates
Out-of-the-box, any view (including the Admin Content view) will show what appears to be duplicate results for multilingual translated content. In reality, the duplicate content being registered by the view is the translated version of the node. If you are browsing the Admin Content view in English, clicking on any of the links to the node will take you to the English version, but it can be confusing to editors.
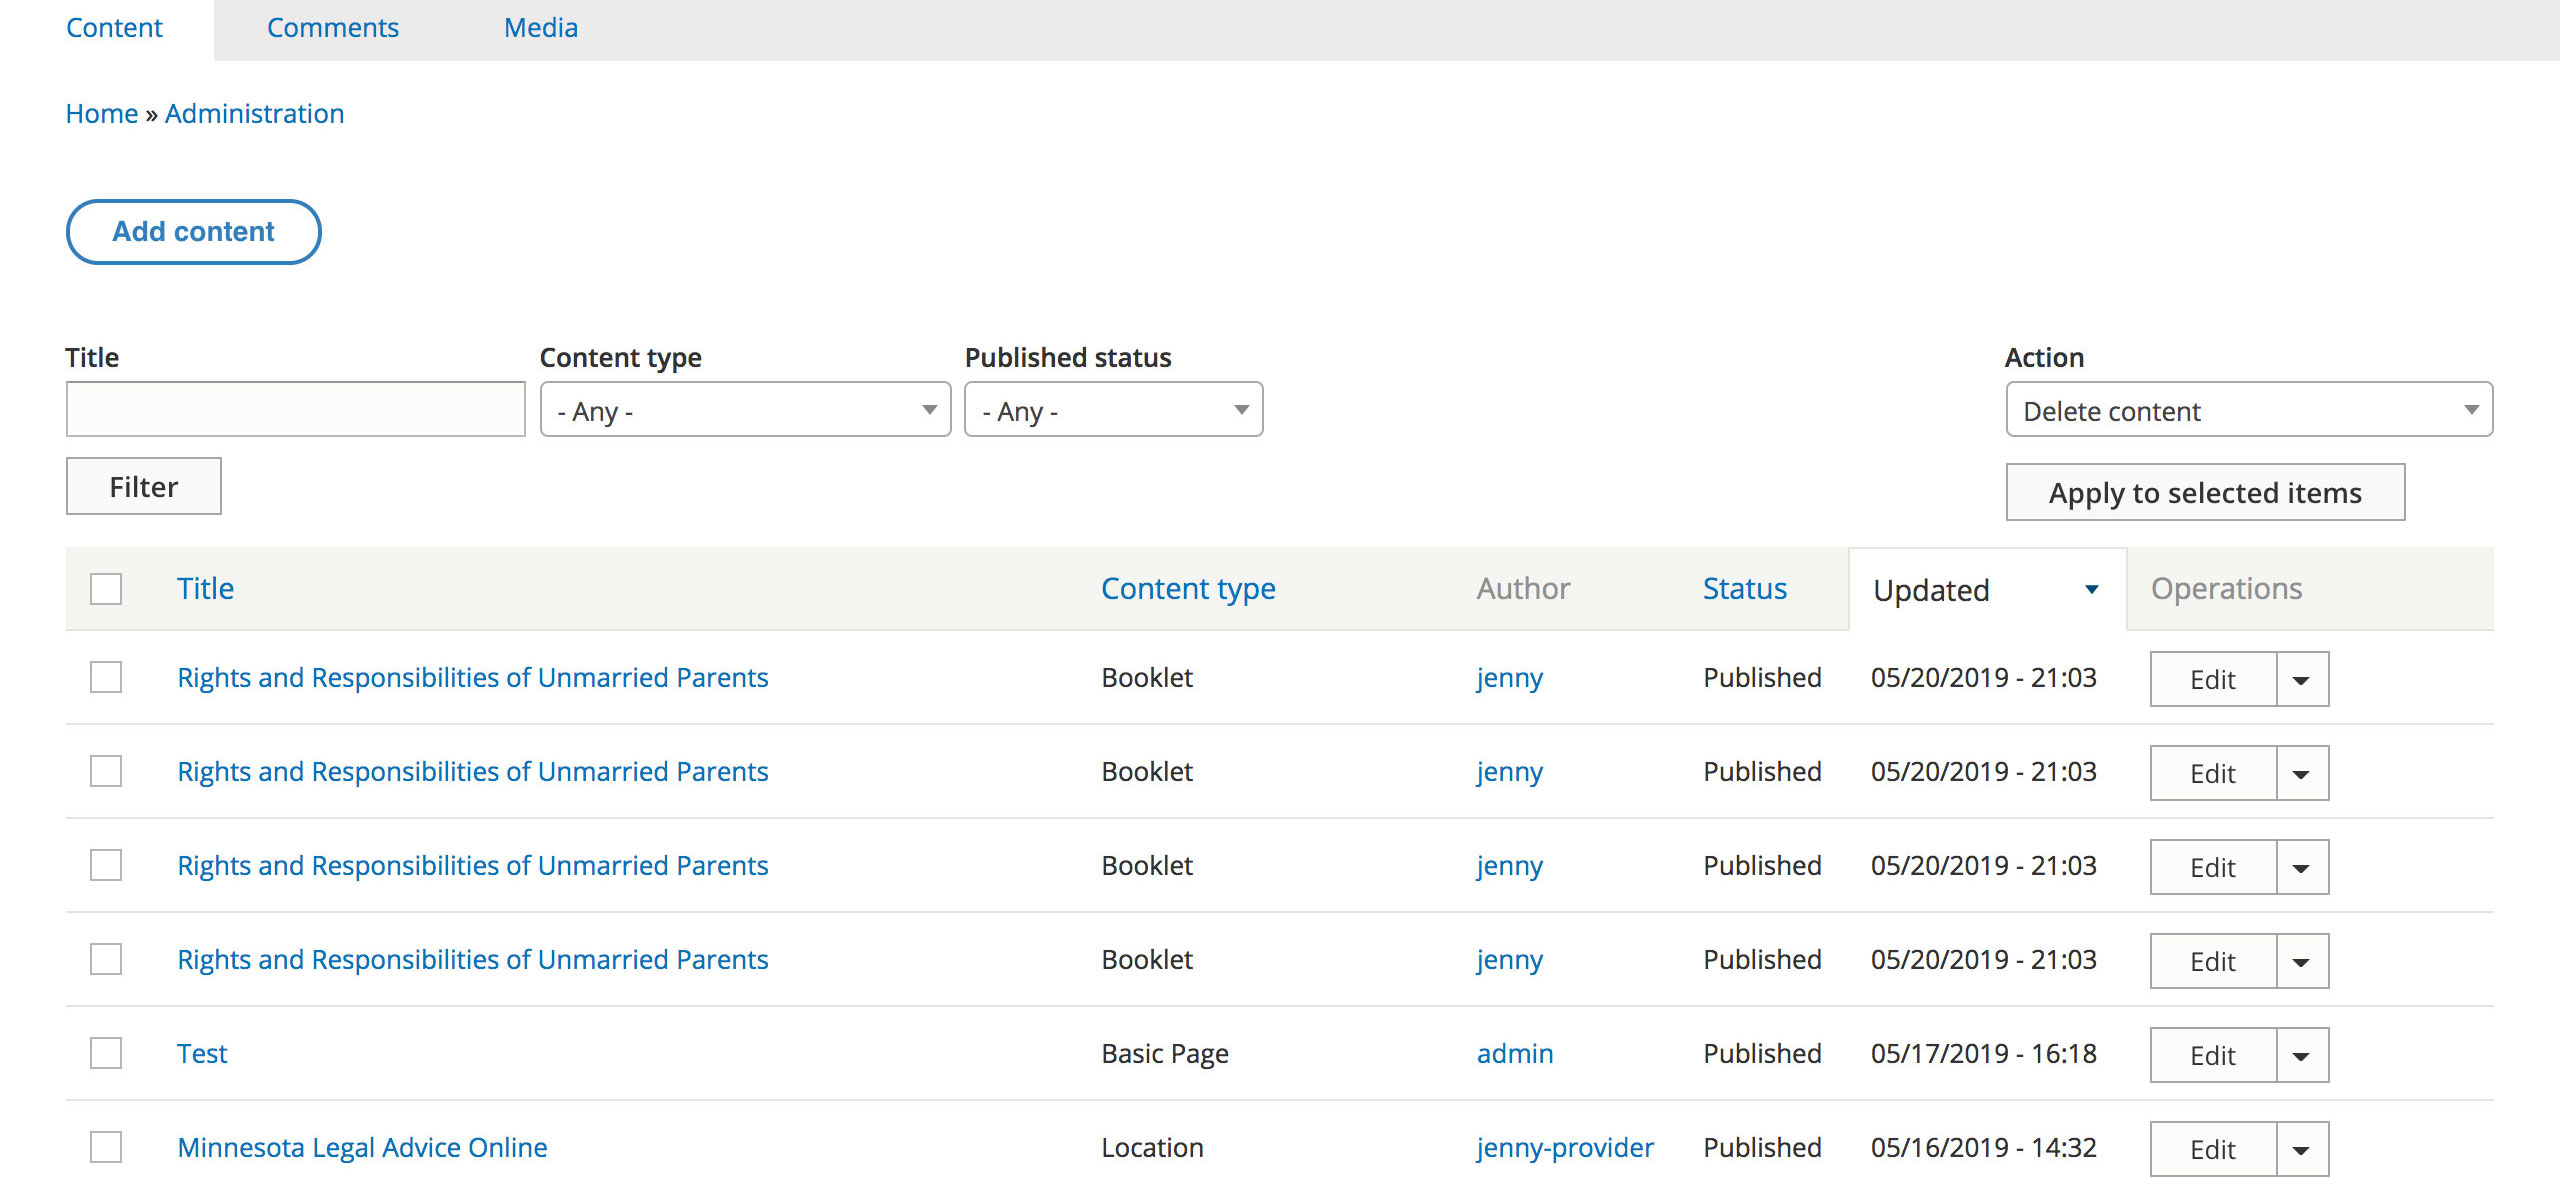
A simple solution to this is to enable the Translation Language filter and set the language to 'Interface translation selected for page.’ This will tell your views to only display the translations for the language the site is currently set to.
When using this filter, you’ll also want to ensure that the Rendering Language is set also to be ‘Interface language selected for page’ so that the translations are displayed in the current language.
Setting both the language filter and rendering language to the currently selected language, for all views that have translated results, will remove the duplicate results for translations and ensure that the correct content is always shown in the correct language.
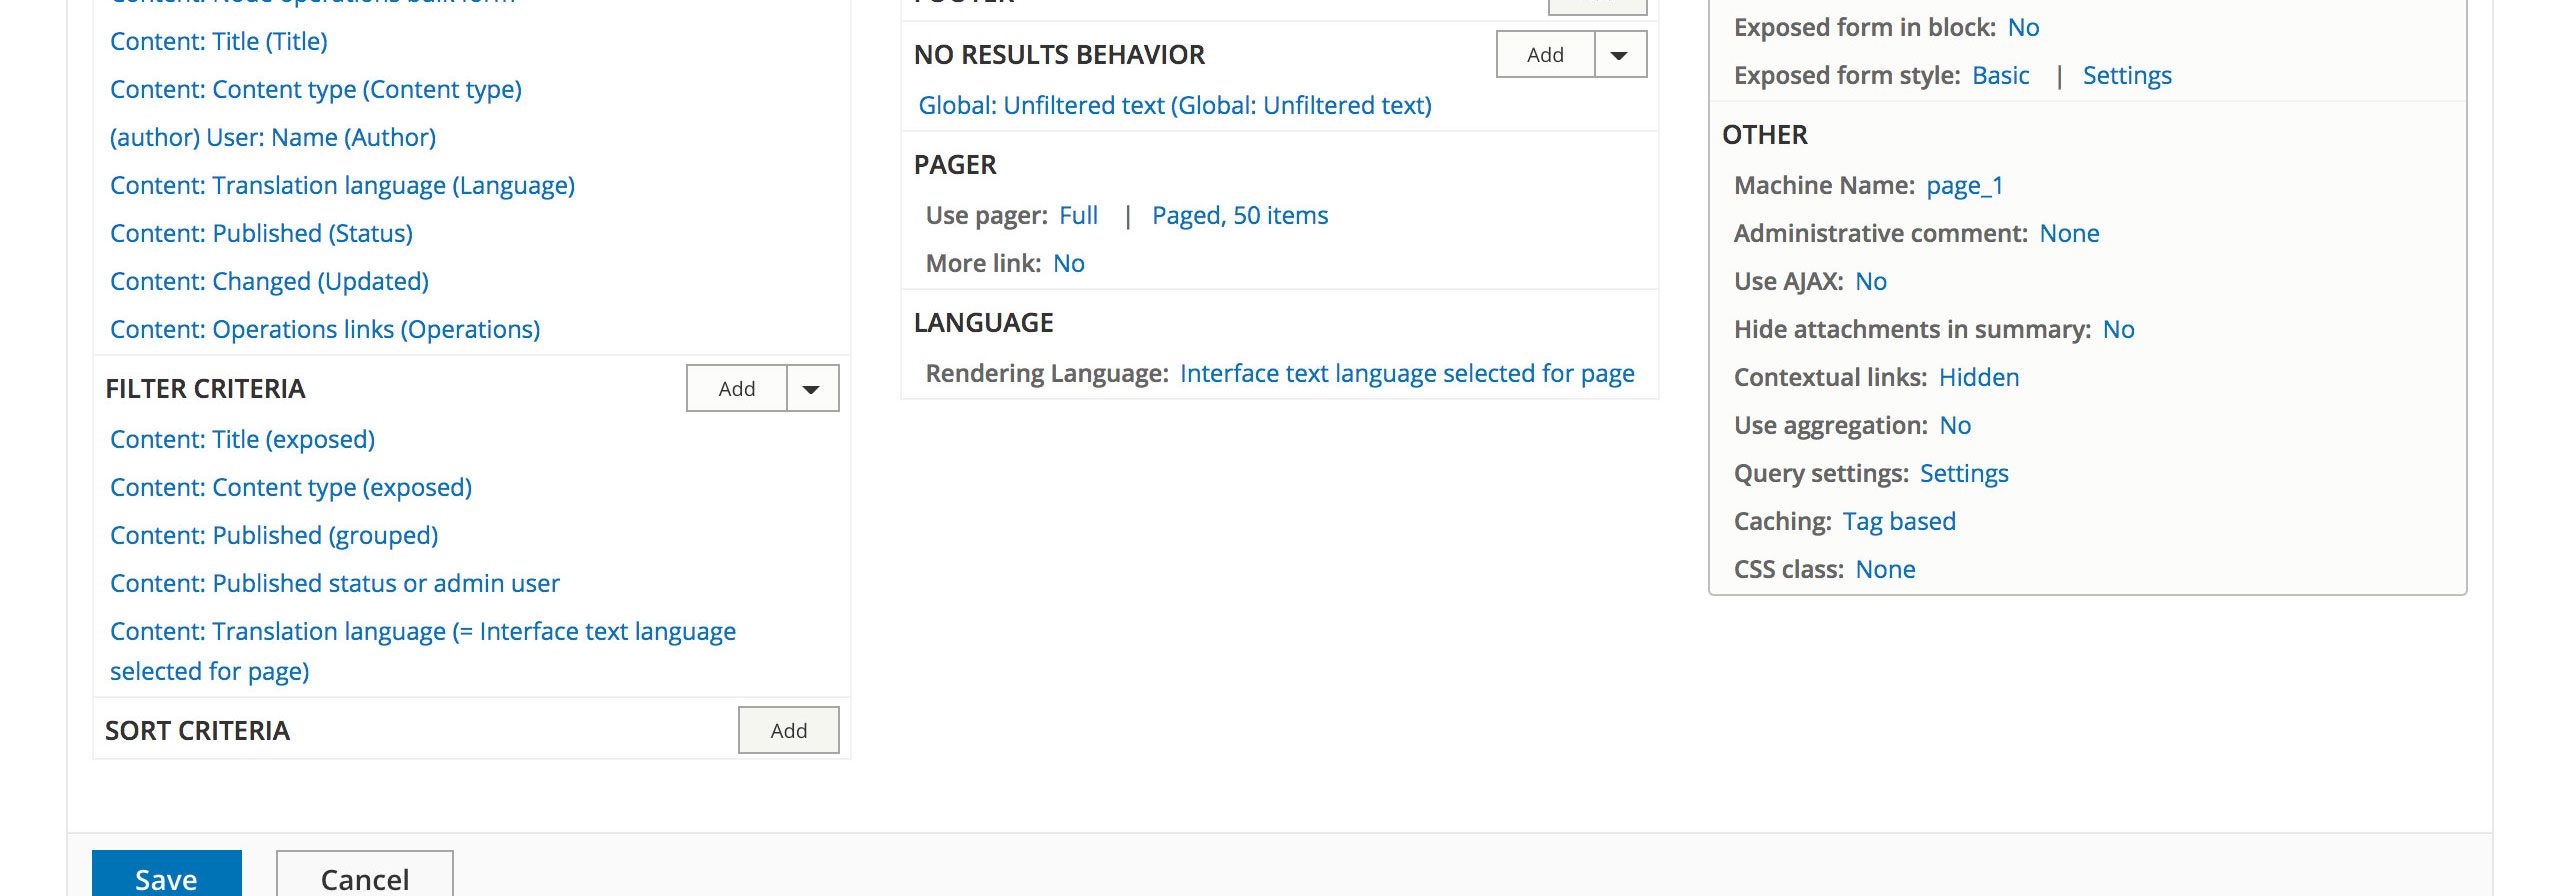
It can also be helpful to add a language column to editorial views that have translated content. Displaying the language of the translation lets editors see the language of the node they are going to be editing—which can be very handy if there are languages on the site which editors are unfamiliar with.
Current admin language
Another common issue for editors is not knowing which language is active when navigating the admin side of the site. When using Drupal provided languages the admin side of the site will often be partially translated, but the amount of admin interface translation depends on the language and the part of the site you are in.
For example, an editor starts in English and goes to the Admin Content view and clicks Add Node. They add a node, then click the Translation tab to create a Spanish version. They do the translation, save the node and see the node displayed in Spanish. Now, they want to add a link to the node in the main menu.
They go to the main menu UI and often don’t realize that the active language is still Spanish. In the screenshot below, the only default indicator to let the editor know they are still in Spanish are a couple of admin toolbar links in Spanish and /es in the URL.
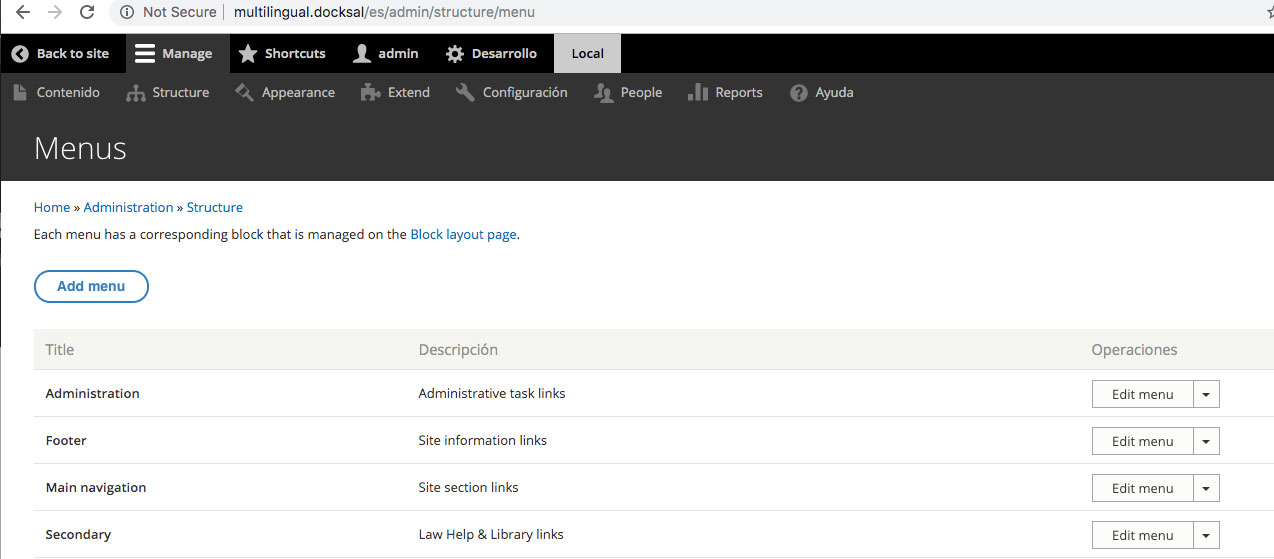
This is because the interface translation for Spanish has not been done for the bulk of the menu UI. Even when creating the menu link, there are only a few description text strings, the Enabled checkbox and the Save button in Spanish. A sharp editor will catch that, but someone less familiar with the menu UI could easily miss these indicators.
In our example, after adding their menu link, the editor clicks Save and then goes back to view the site. They see that there is now an English link to their new node on the Spanish translation because they unknowingly added the English link in the menu UI while the admin side was still in the Spanish language.

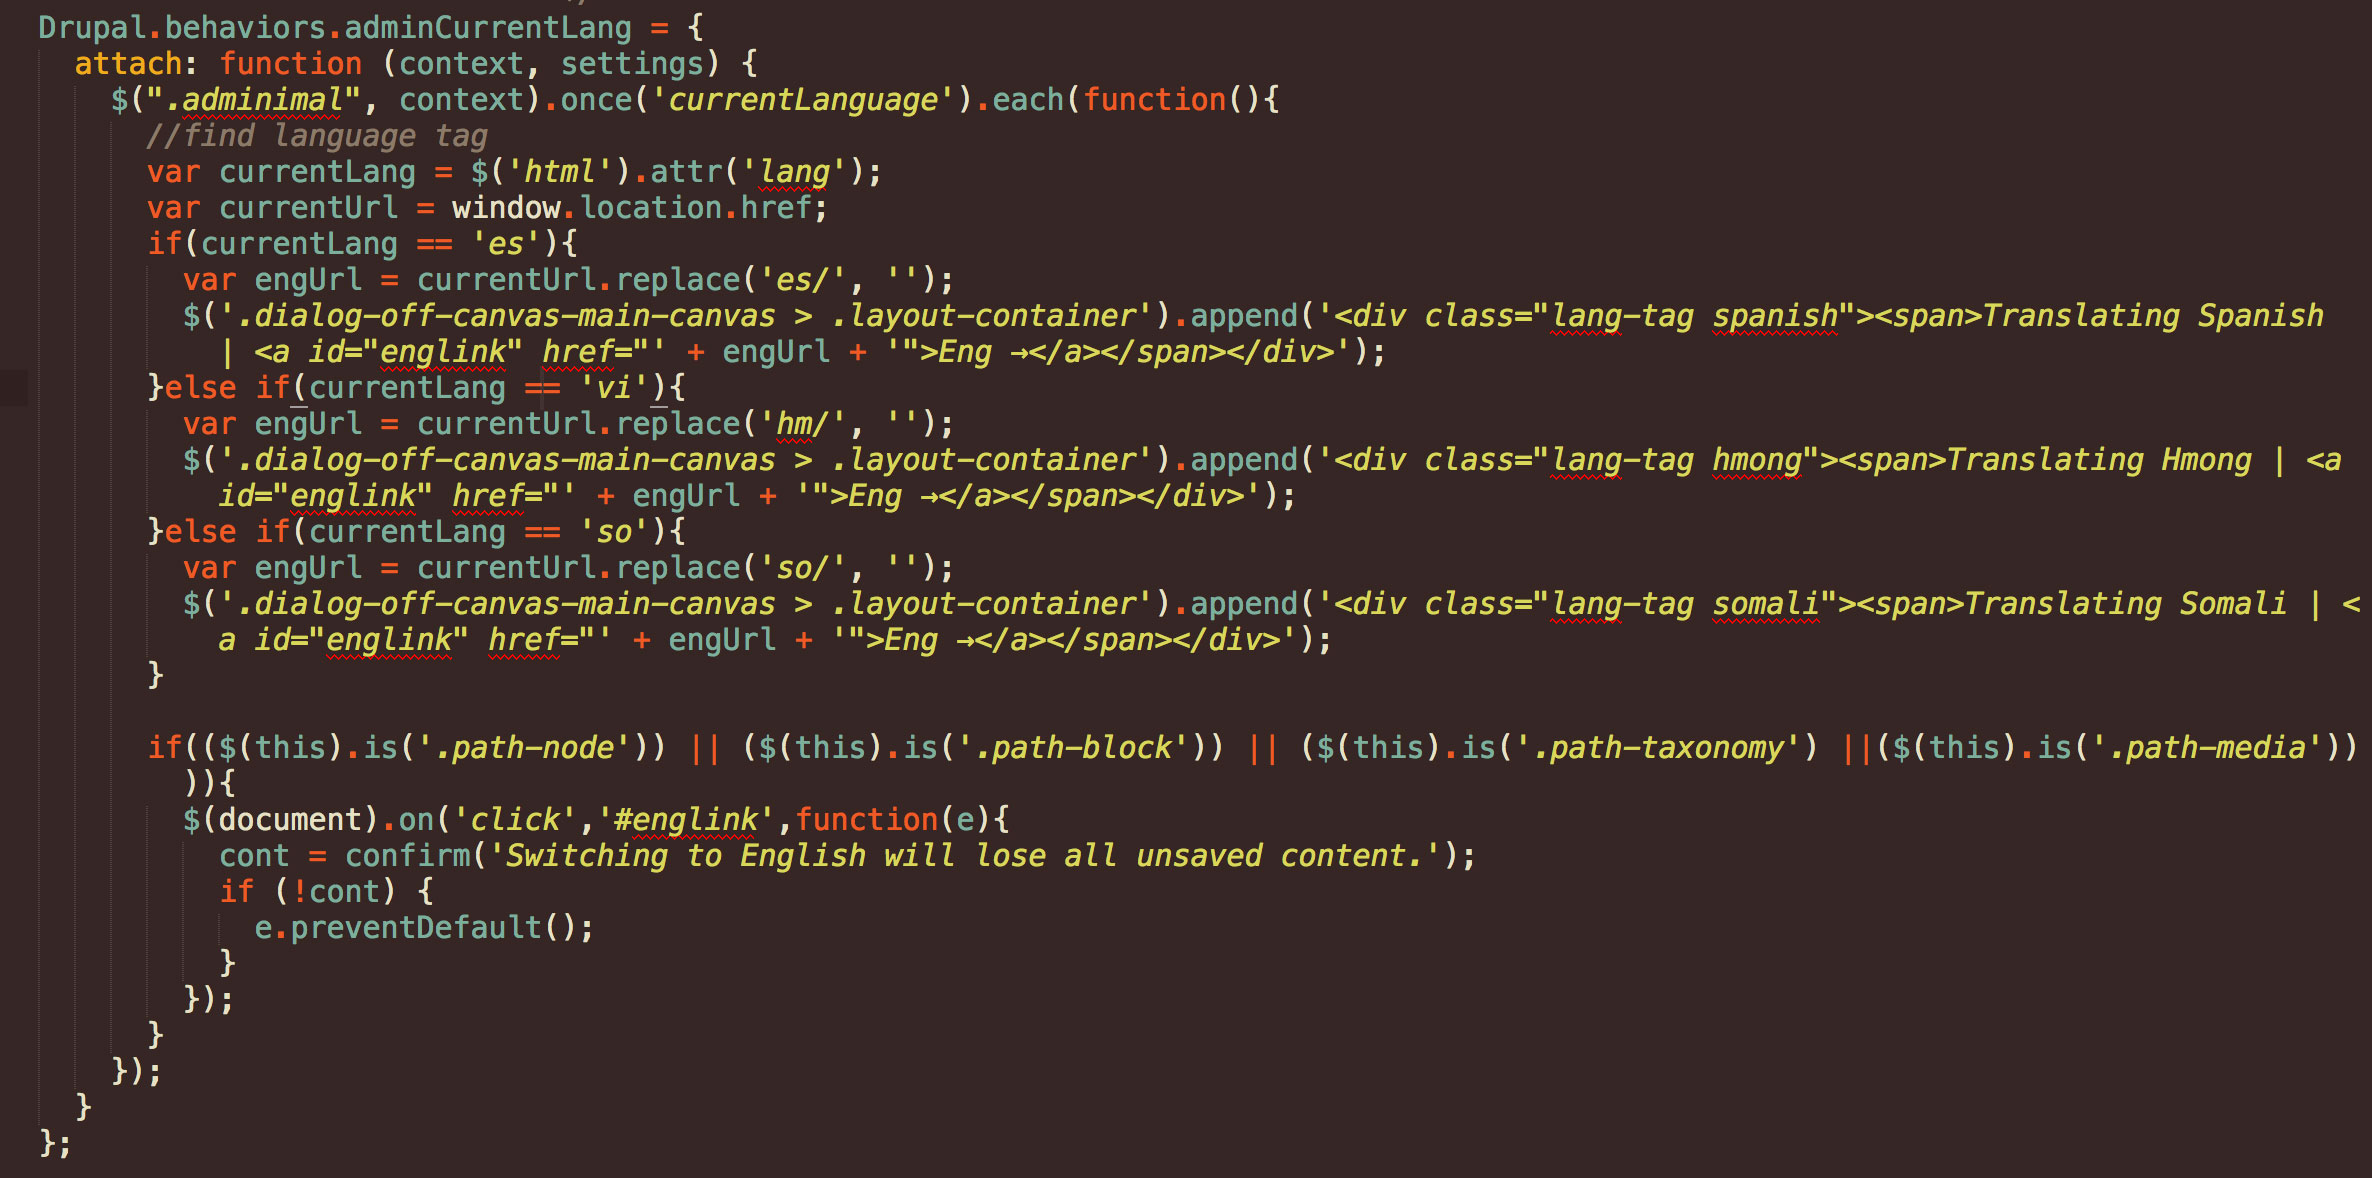
Providing an easy visual method for editors to detect the current language in the admin theme can be done by adding a bit of JS and CSS via a custom module or your custom admin theme. If adding via a custom module, you’ll want to be sure to add the library loading the JS and CSS files to admin pages only.
The first thing to do is to detect the current language of the site. This can be done by reading the lang attribute of the <html> tag. You’ll also want to fetch the current url using window.location.href. Set them both as variables.
Once the variables are defined, a simple if/else statement will create the visual tag. Since we’re creating a tag for the current language, we might as well add a link back to the default language with the tag.
Lastly, some path detection can be used to add a confirm message on edit forms when the user clicks to go back to the default language letting them know unsaved translation changes will be lost. A bit of CSS will fix the tag to the bottom of the screen.
Translated field labels on edit forms
The goal of a multilingual site is to provide translated content. However, having translated content on the admin side is not always a desirable thing—especially if your editors are not multilingual!
The screenshot below is part of the node edit form for a booklet node being translated to Spanish. Because Spanish is a Drupal-provided language, much of the admin interface is translated automatically when the language is added. Fields that have their labels translated for the end user in configuration translation will also show that translated field label to the editor.
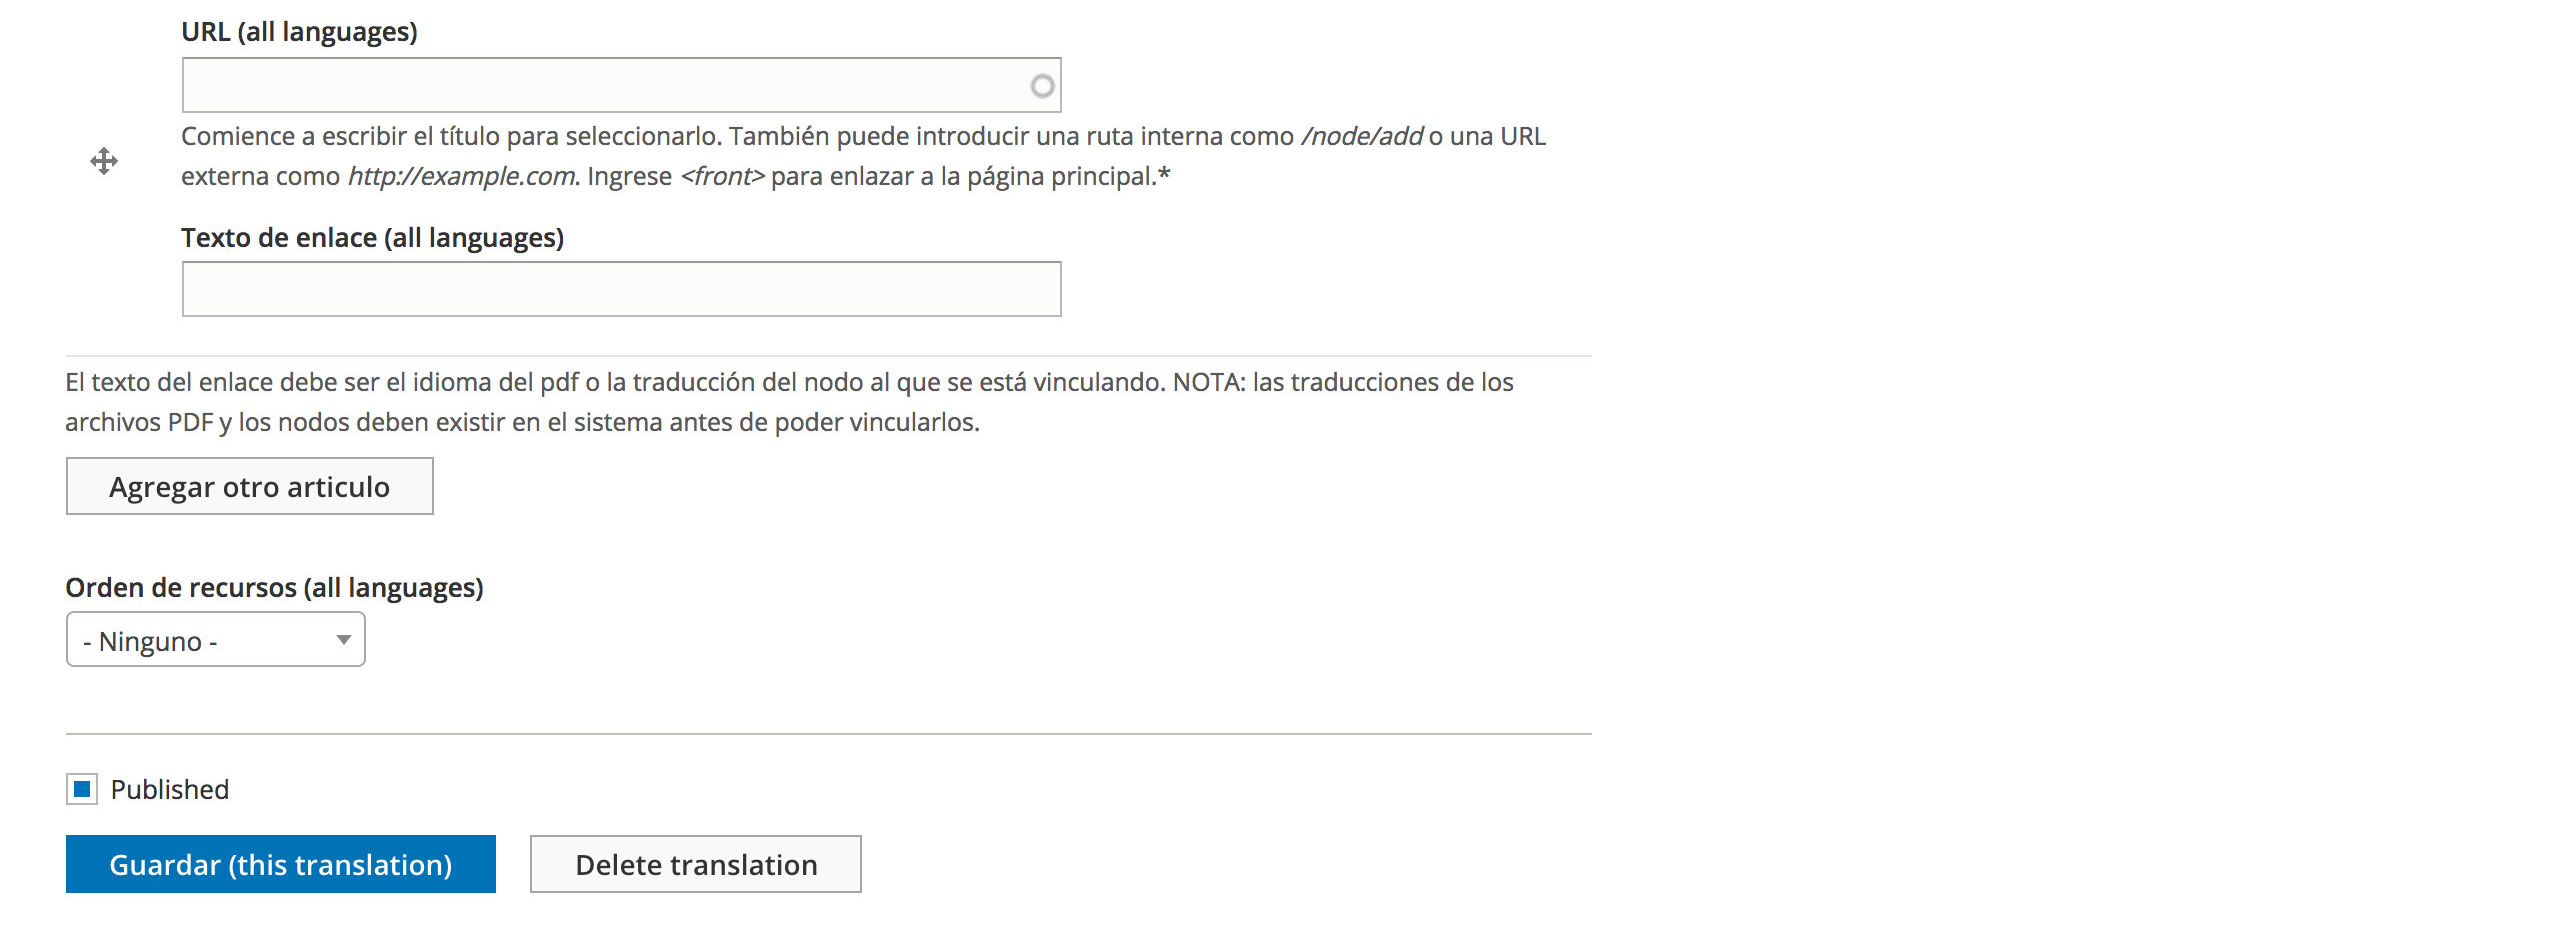
An editor who is very familiar with the booklet node form, or one who remembers their two years of high school Spanish, may be able to puzzle out what the bottom two fields are, but what about a new editor who only ever learned some German?
Field groups are the best choice when it comes to making edit forms easier to understand, and can help give editors a clear picture of what they are editing. By grouping fields together and arranging them in the order in which they appear on the rendered node, the editing experience becomes more intuitive and tied to the content. This is helpful for both English editing and translations.
Field groups are particularly key for translation. Field groups come with names shown only to the editor. By using a field group even for just single fields on a content type and naming the group just slightly different then the field it contains, the fields themselves can have translated labels for the end-user but the editor can still see the non-translated Field group label.

Beyond installing the core Multilingual modules, enabling translations and setting the configuration translations, there are a few things that site builders should be aware of when working on a multilingual build.
Linkit and Pathologic
These are two modules that every site should use—regardless of multilingual. Linkit provides autocomplete and some advanced link settings for both WYSIWYG links and field links, and Pathologic helps ensure that link paths remain unbroken—even if the linked content is moved or the URL of the site changes.
Using them on multilingual sites has some added benefits. If you are using the 8.5 version of Linkit or greater, Linkit will add current language translations to the autocomplete links list. If you are editing a Spanish node, Spanish translations will populate the autocomplete results if available.
You can also link a non-translated node and if a translation becomes available later, Pathologic will add the language prefix as an option to the link URL. This means that links will not break and will always go to the current language translation if available and if there is no translation available they’ll automatically go to the default language version.
Search & Transliteration
If your site uses Search API or another search mechanism that has a setting for Transliteration, make sure that option is always used. On single language sites, using Transliteration is helpful for processing things like apostrophes or hyphens in a person’s name or a node title. On a multilingual site, however, transliteration is a must for processing umlauts, accents, tildas and all the special characters that come with foreign languages.
Pay attention to the little things
As with any Drupal site build, there are many small options tucked away that can and should be used for a truly robust multilingual site. The following list are a few of the things you’ll want to make sure that you pay attention to:
- Enable translation for media Alt fields (and require them).
- Always use the translation language filter set the interface language for views.
- Make sure you have translated URL patterns set for URL aliases.
- Remember that many foreign languages put the day before the month when displaying dates.
Front-end development for multilingual sites is not that much different than single language sites. There are some tricks and things to be aware of, however.
{% Trans %} and |T
When coding custom strings in Twig, always make sure that you use either the {% trans %}{% endtrans %} tag, or the |t filter. I prefer to use the {% trans %} tag because it will translate both strings and placeholder variables, whereas |t will only translate simple strings. Remember that when you add translatable strings in Twig, you must clear the cache and visit a page where that translatable content appears in order for the string to become available the iniInterface translation UI.

Node Canonical Paths for Twig Links
The method for coding links is the same whether you are working on a multilingual or single language site. Using /node/X to link to the node works in both, but when a user hovers over the link to read the URL or when its read by assisted technology, https://mywebsite.com/node/X is not the most helpful. On a multilingual site, /node/X will also only go to the default language version of the node—no matter what the current language is. You could use a preprocessor to fetch the current path or language and write some Twig logic to add the correct prefix to the link, but why not use the canonical path instead?
Linking to the canonical path of a node in Twig is just like using the Link to Content function in views or linking to a node via Linkit in WYSIWYG. It will use the node ID you give it and render the alias path to that node as the link URL. The canonical path gives a helpful link URL when a user hovers over a link or its read by a screen reader, and it will also link to the translated version of the node if there is a translation in the current language.

Translating JS
There is no multilingual method or Drupal method to translate JS. There are however some strategies you can use to translate JS strings directly in your JS code. Using the same method to detect the current language from the <html> lang attribute (or from the URL prefix or a body class if you prefer) as we did for creating the custom language tag, you can simply set variables for each item you need translated and add the string translations in the JS itself.
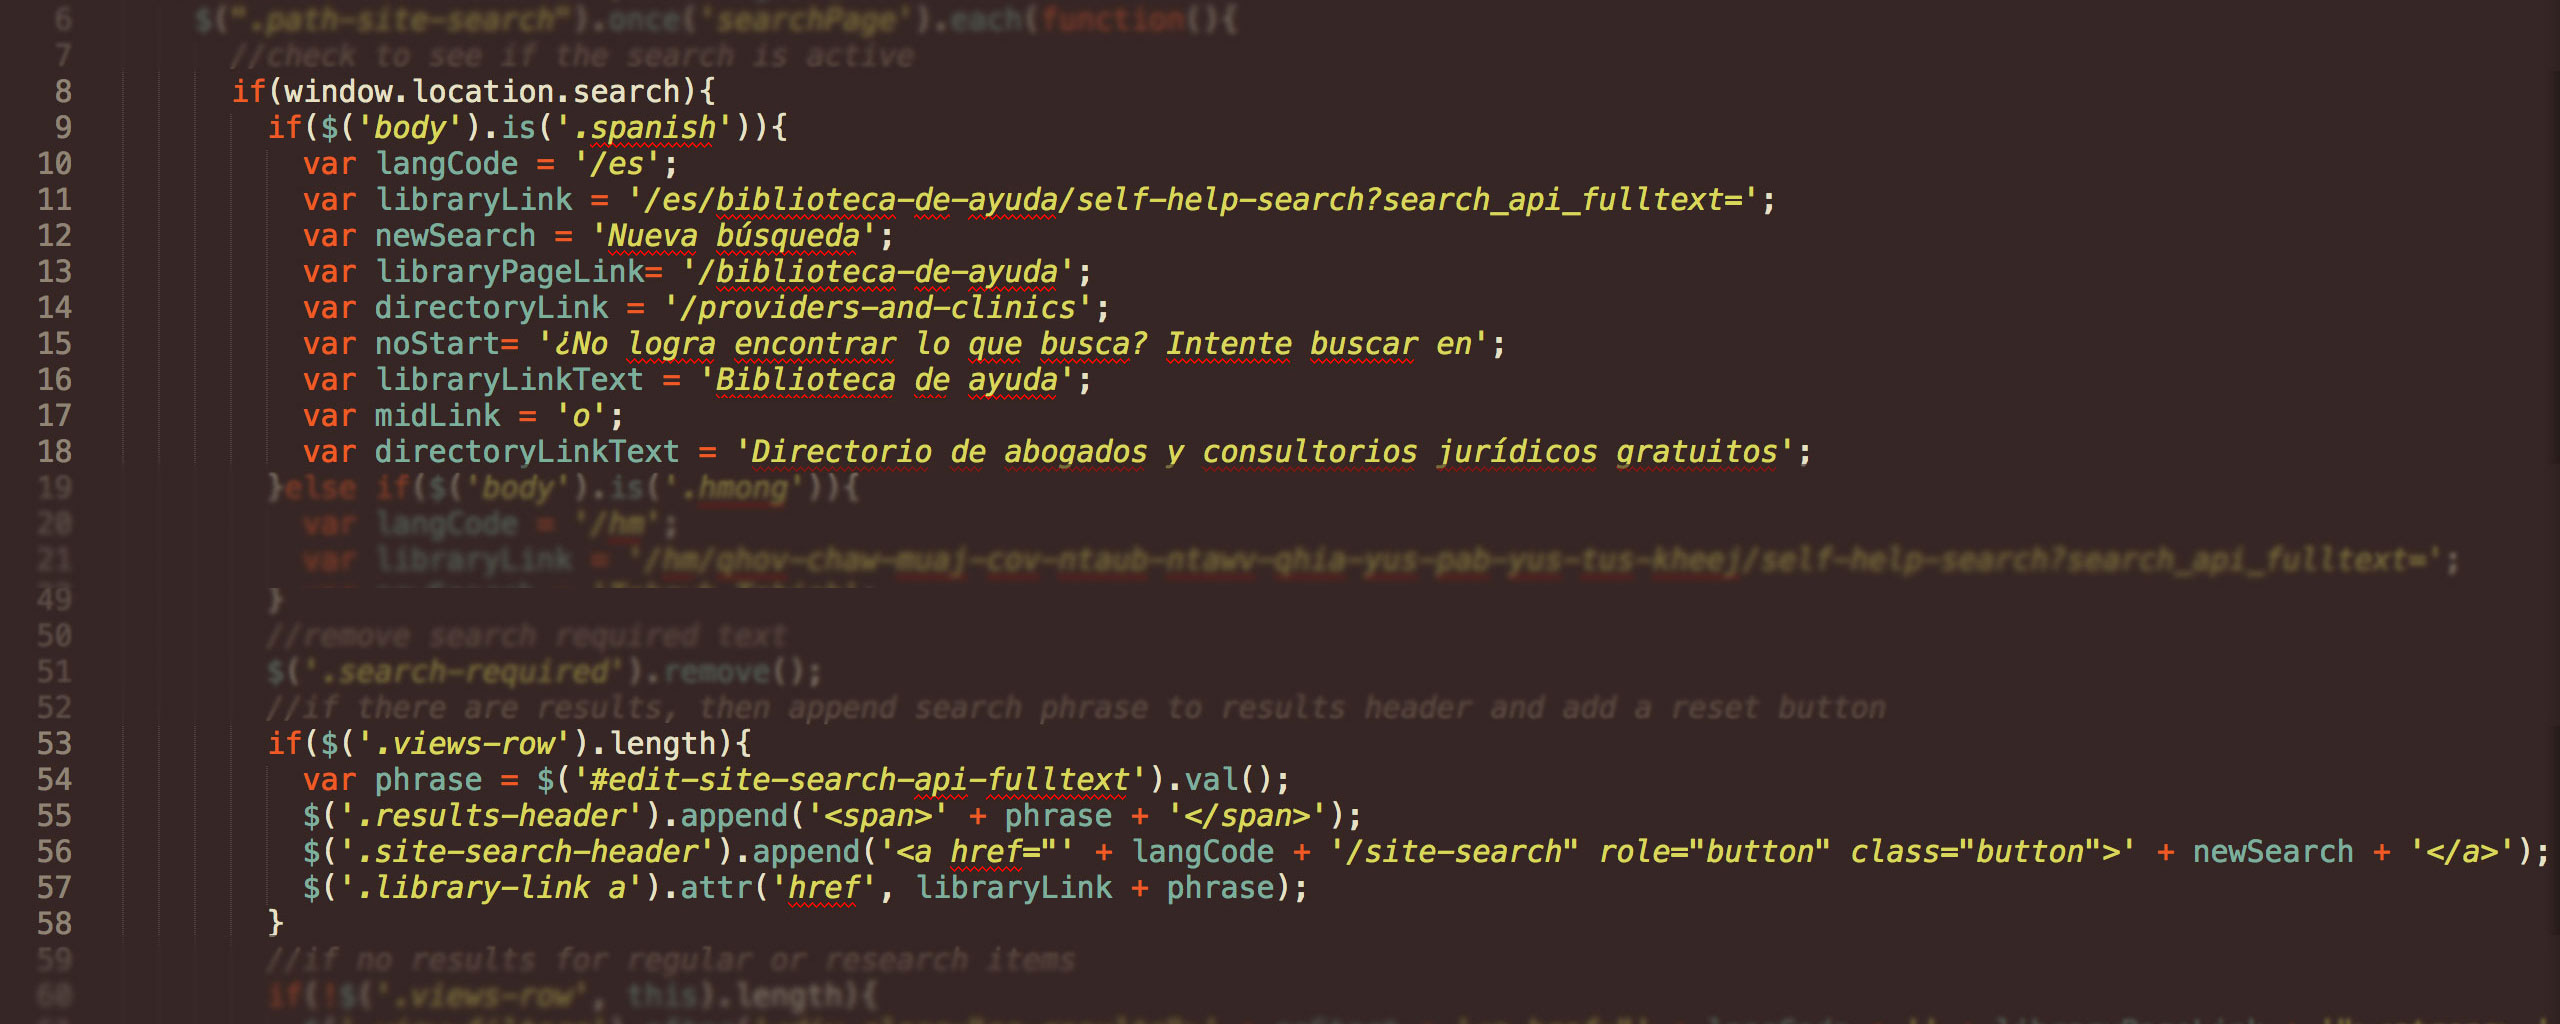
Smart Language Switcher Block
The language switcher block that is shipped with Drupal is functional, but not so smart. If a user is viewing a node with no translations, the language switcher block will still give them the option to switch to a different language. The header and footer information may change to the language they select, but since there is no content translated for the node, they may be confused as to why they selected a language and got English content. The image below is node that the user is viewing in Hmong, but that has no Hmong translation.
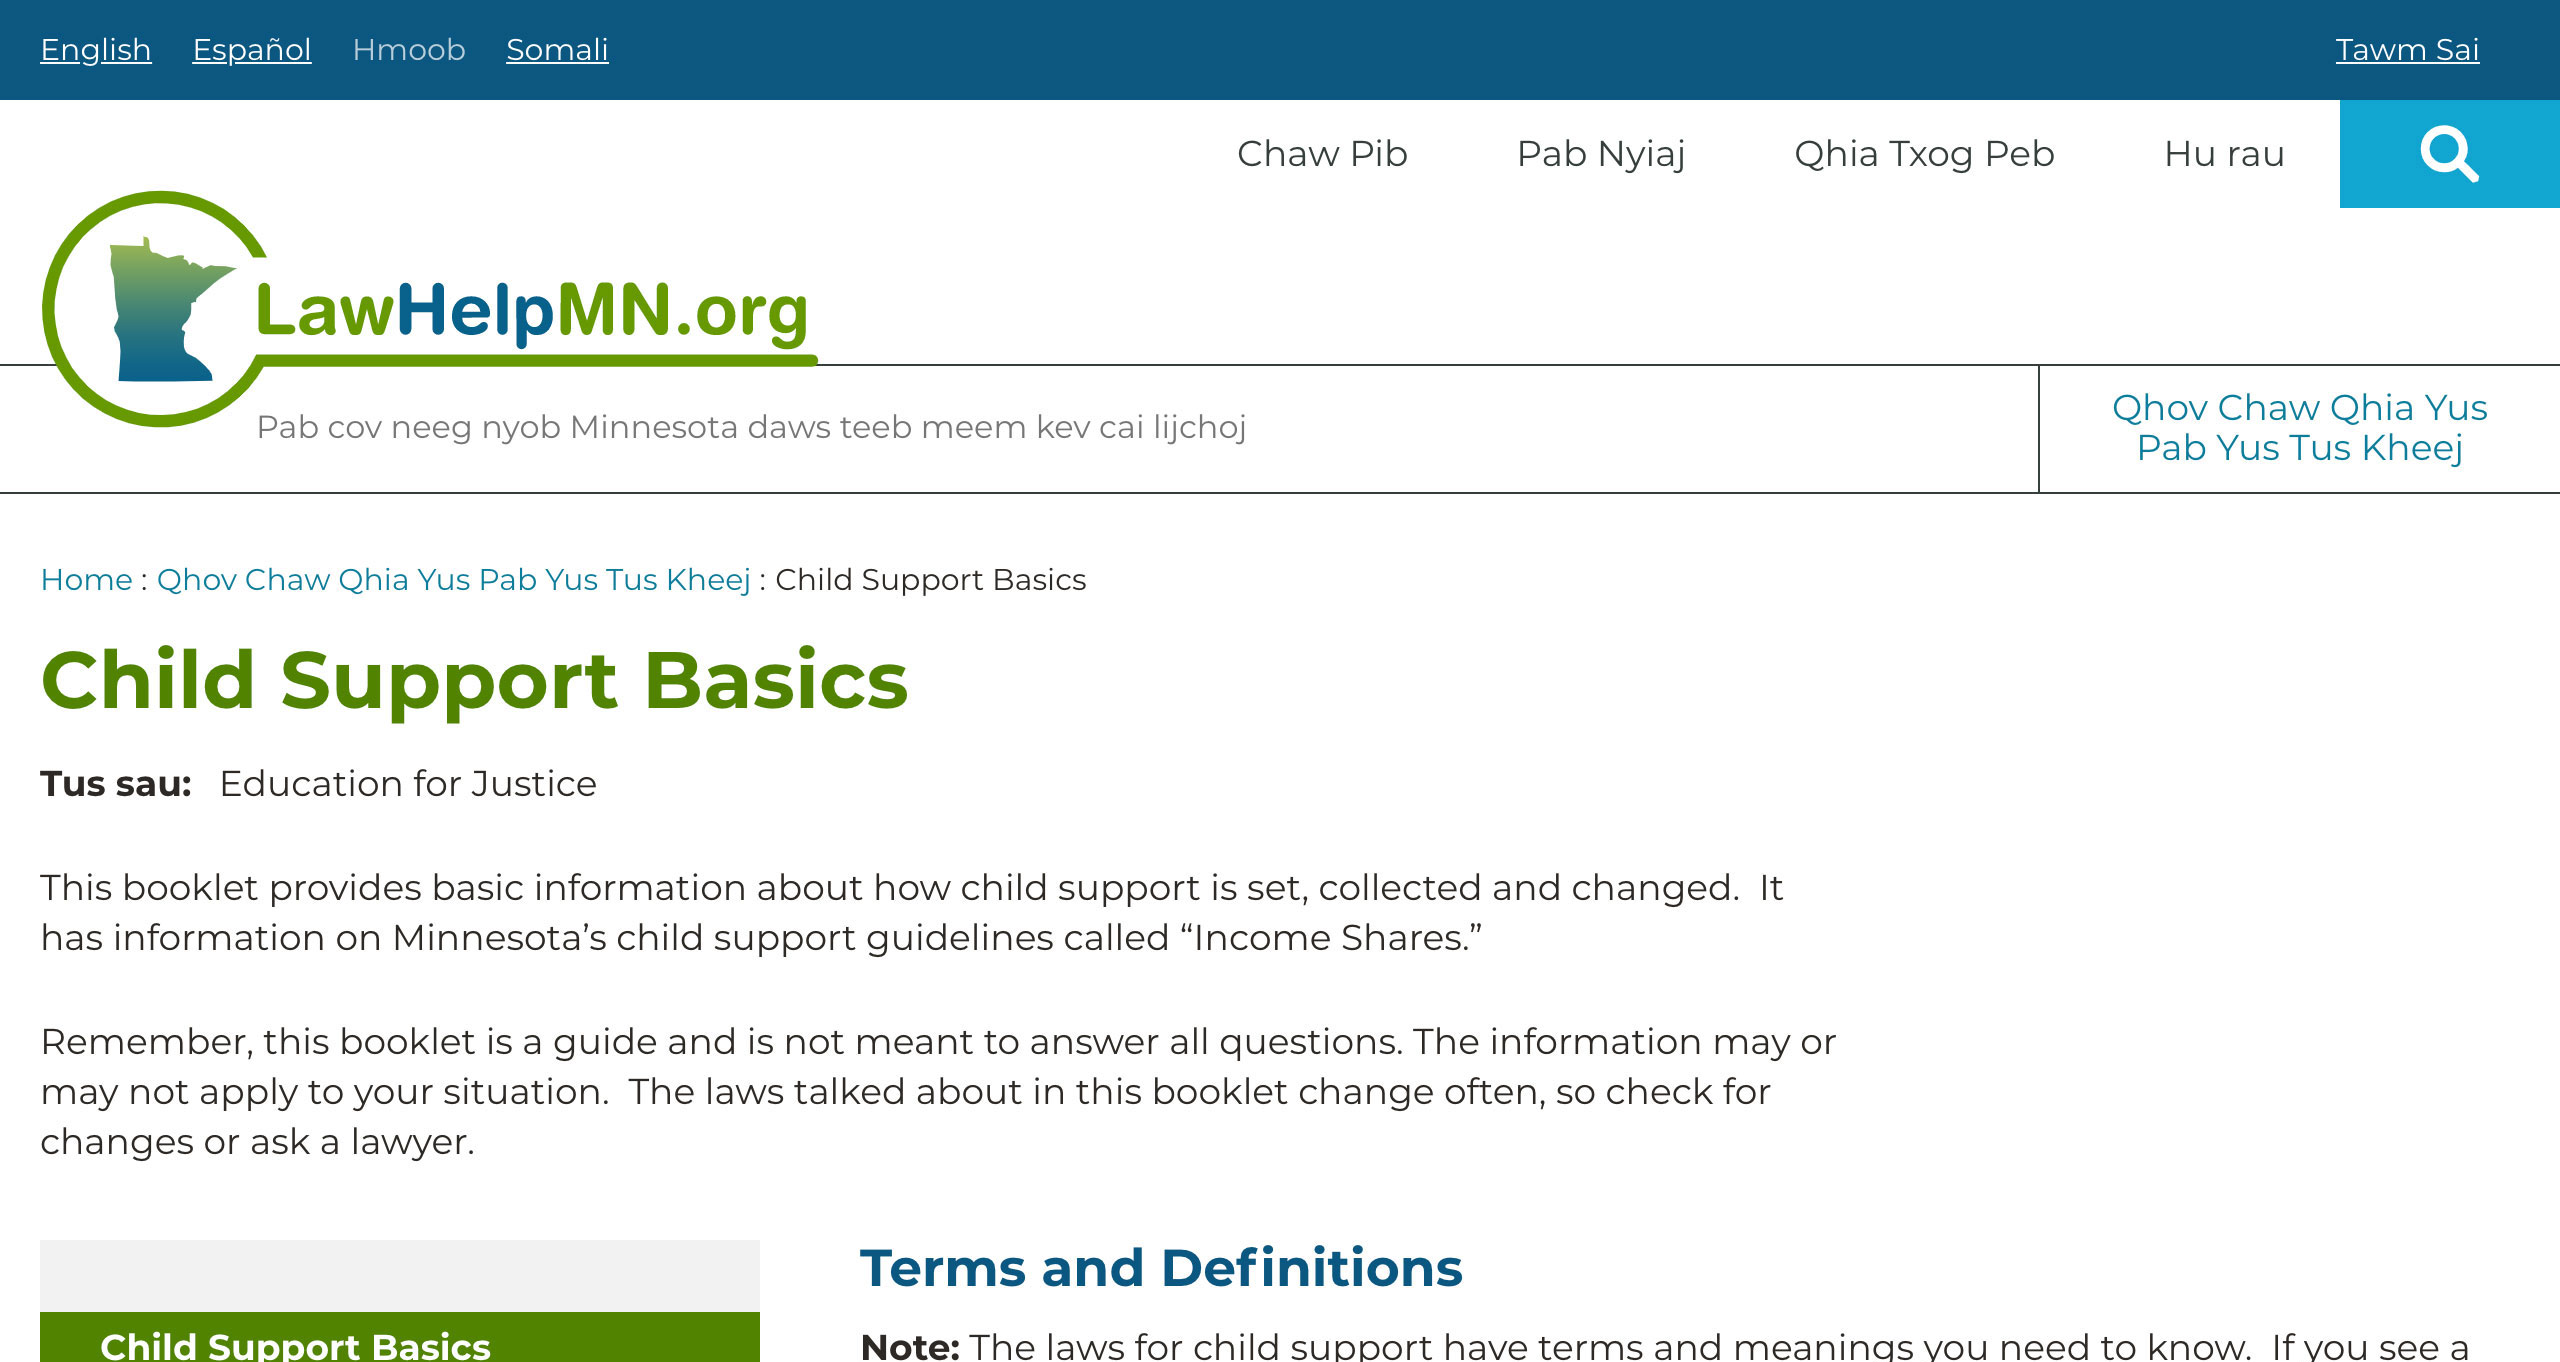
Instead, wouldn’t it be better to only show languages that have translations in the language switcher block? A user could still end up seeing non-translated content on the node if they came there from elsewhere in the site while viewing in Hmong, but they would not be clicking on their desired language and getting no content in that language.
We can "smarten-up" the language switcher with a combination of preprocessing and Twig. First, we’ll want to use a preprocess_links hook and fetch the current node via routeMatch. Then we add a check for the current revision if revisioning is enabled and set the getTranslationLanguages() method as variable to pass the list of available translations to Twig.

Once the translations are available to Twig, we create can create a custom template for the links in the language switcher block and write some logic to check if there are translations available for the node and only print the language links for available translations.
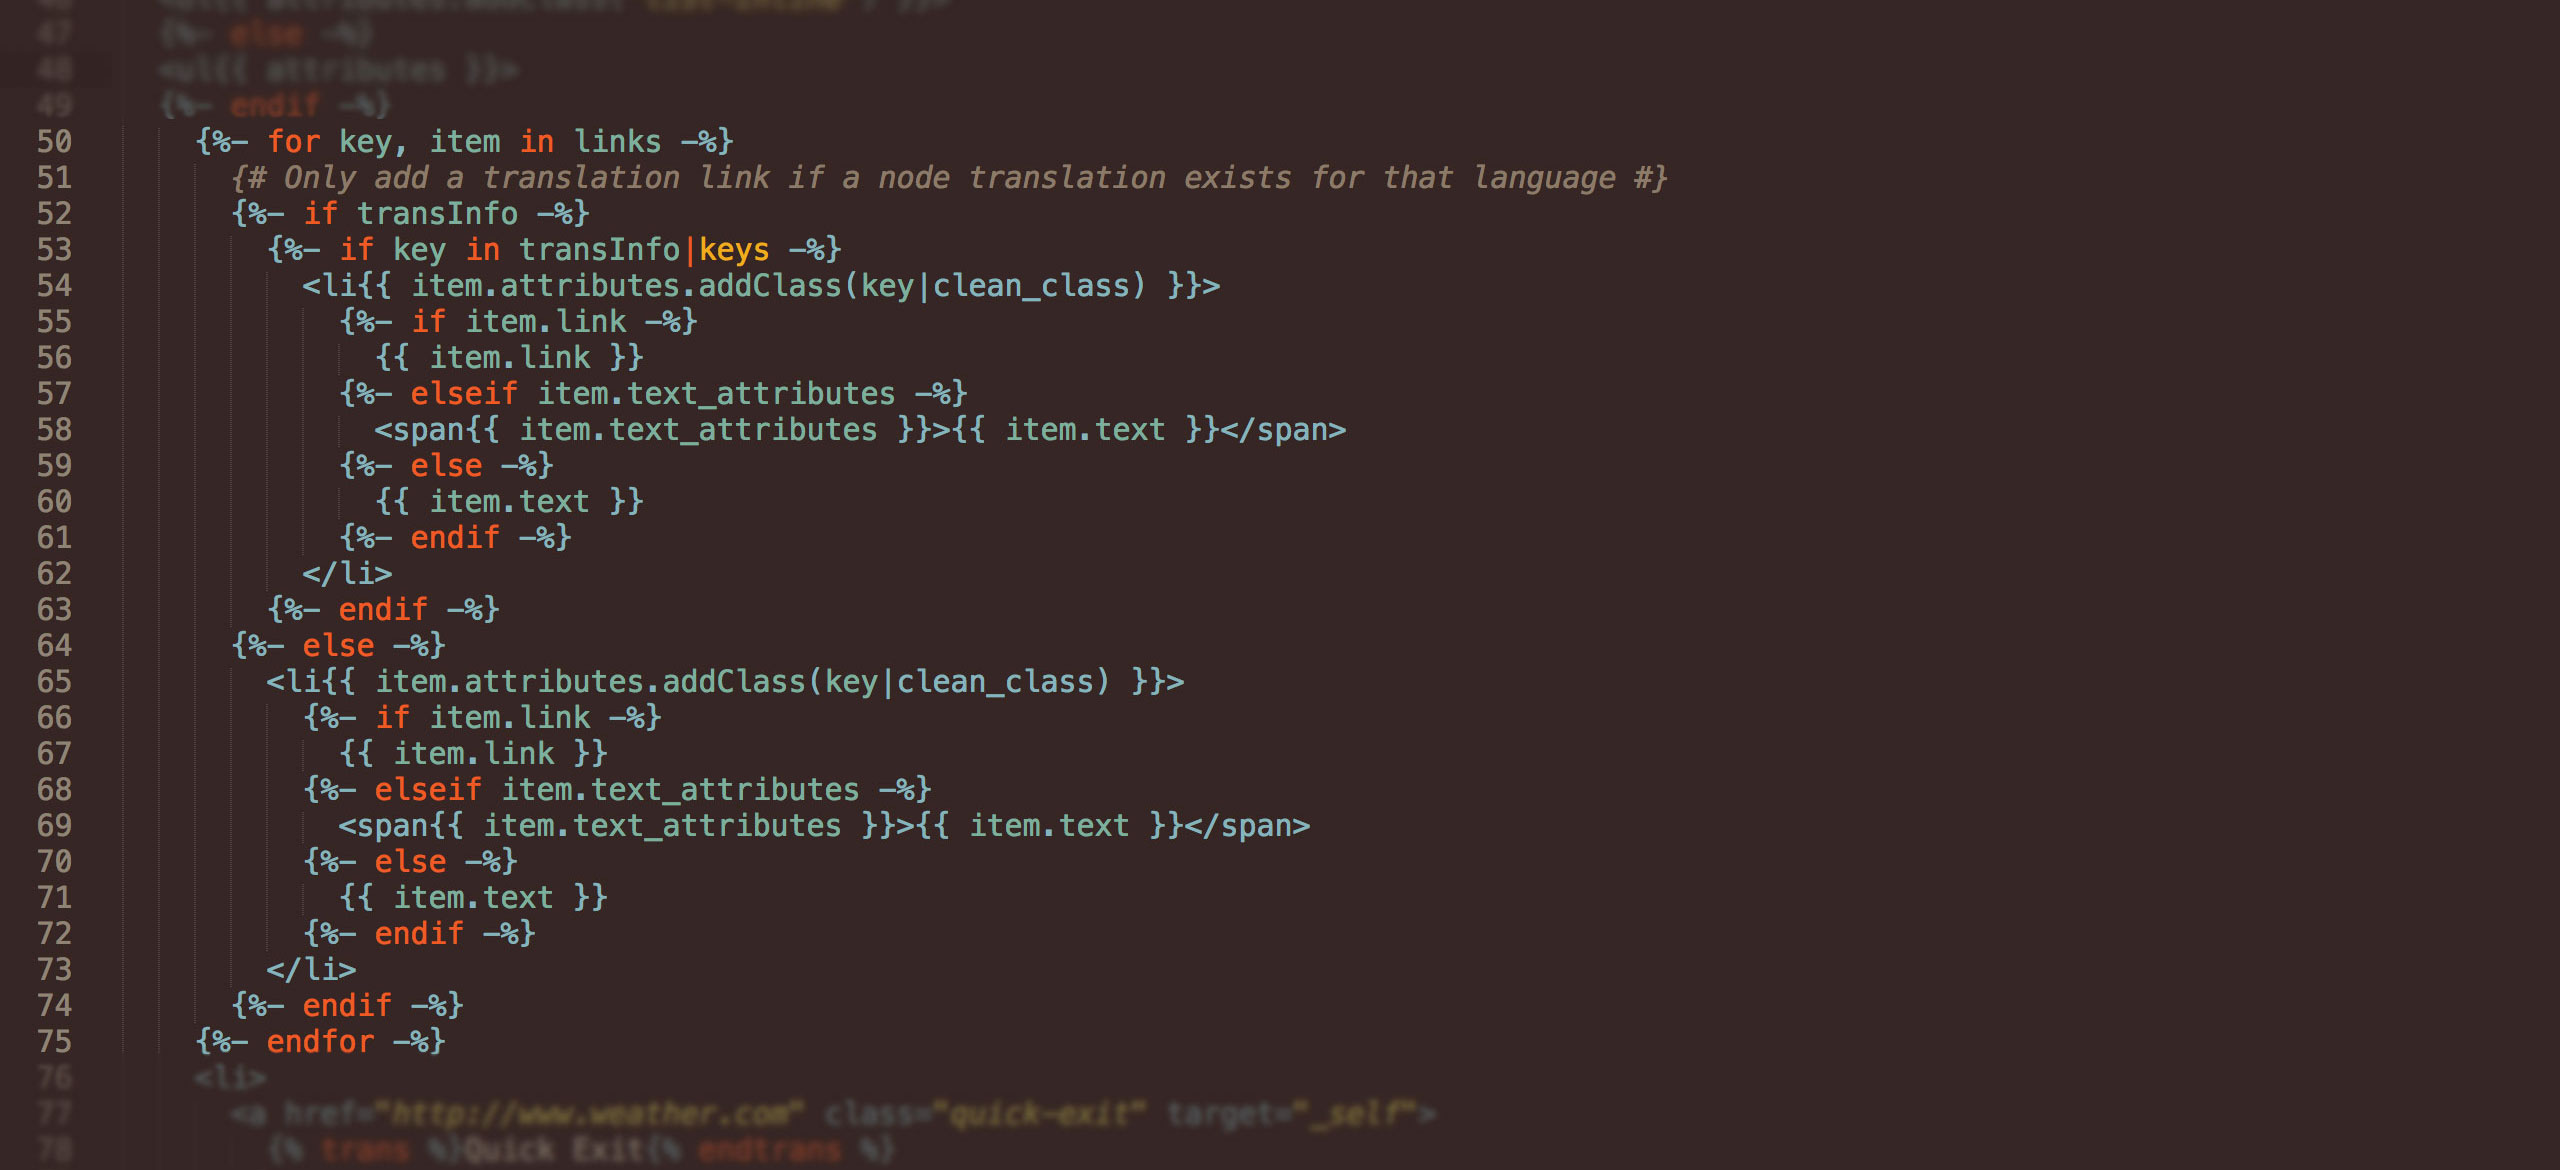
The language switcher block will now output only the list of available translations on nodes. NOTE: The full list will still be output for views pages, page manager pages, or any non-node pages on the site—although more preprocessing could be done for each entity-page type and the available translations could be passed to the custom template for additional checks.
Over the course of this blog series, we've discussed project management, design, site-building and front-end development strategies for Drupal 8 multilingual websites. Multilingual is such a large topic that splitting the series into three posts seemed like a good way to parcel the information into manageable chunks, but it also runs the risk of the reader not finding or processing the whole series.
So here are some key multilingual takeaways from each section of the series:
- Realize and plan for the large impact that a full multilingual build will have on project scope.
- Lock-in configuration and interface translations as much as possible before doing adding them to the site because each change multiplies the amount of work by the number of languages.
- Leave a little more white space and think about right-to-left languages when designing.
- When adding a custom language, make sure you use an approved language code.
- All entities in Drupal can be translated, but when enabling content translations with Metatag or Paragraphs, do not hide untranslated fields.
- Interface translations set in Twig templates need to have cache cleared and the page where the translated content will appear visited before the string will show in the interface translation UI.
- Be nice to your editors—views interface language filters, custom language admin tags, and filter groups will go a long way to a pleasant translation experience.
- Always use Linkit and Pathologic, but with multilingual, make sure you are using at least Linkit 8.5 or greater.
- Preprocessing routes to get the current language as a variable that can be passed to Twig can be a powerful way to customize any aspect of multilingual front-end.
- Always use the node canonical path for links in Twig code.
Hopefully, you found all these articles helpful. If you did, let us know by sharing with others and adding your comments to the site.



Join the Discussion +