
It seems like every Tom, Dick and Harry content management system gives editors a way to easily manage their media. So why should media be a struggle in a platform as powerful as Drupal?
At its core, Drupal 8 offers just a lonely image or file field that forces an editor to upload new media from their desktop. Thankfully, the built-in WYSIWYG editor (CKEditor) now adds the ability to caption images and there are rumblings of a core media library solution in future Drupal versions. But for now, straight out of the box Drupal 8 media implementation still seems limited and dated.
Yet all is not lost
With the right configuration and no custom code, you create a media solution with that is:
- responsive
- field-able
- embeddable
- caption-able
This is the first post explaining how we manage Media and Drupal 8 at Electric Citizen.
Step 1: Install required modules
The base modules (Drupal 8) you’ll want to install and enable are:
- Inline Entity Form
- Entity Embed
- Entity Browser
- Media Entity
- Media Entity Image
- Media Entity Document
- Video embed field
- Responsive Image
- Views Infinite Scroll
- Ctools
(Entity, Embed, Video Embed Media, and Entity Browser IEF modules will be installed as dependencies).
Pro Tip:
I highly recommend installing your Drupal 8 site with Composer. Using ‘composer require drupal/module_name’ to install the above modules will make sure all the dependencies of each module are installed. If that is not possible, please make sure you get all the dependencies for the modules and have everything in the correct place. More information on Composer in Drupal.
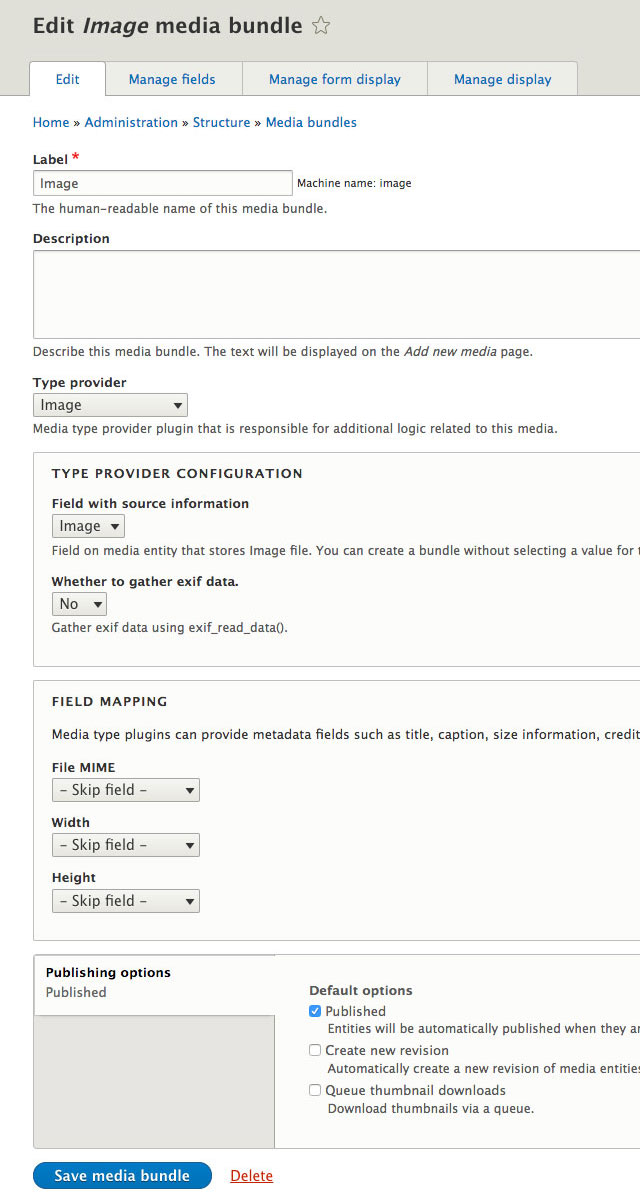
Step 2: Define Media Bundles
Media bundles are Drupal 8's version of file types and can be found in under /admin/structure. We'll make a bundle for each type of media (e.g. images, videos, etc.) and for simplicity's sake, I suggest naming your bundles to match the type of media they’ll be used for. You can choose the media type with the "Type provider" pulldown.
If your media type is not available, make sure you have its corresponding media entity module enabled and have cleared cache. Skip all the rest of the fields and options and save your bundle after these first steps—you need to create the source field in order to configure the rest of the options.
After you save your created bundles, you can go back to add a custom caption field or any other field you require. The only field you must have on each bundle is the source reference media field (image, file, etc). After adding your fields, go back to the edit screen for the bundle and choose your media field as the source.
The edit screen has a lot of other options like having media gather EXIF (Exchangeable Image File Format) data, metadata, and publishing options. EXIF data is camera and settings data recorded in the image file by your digital camera. I recommend using the default for all of these options to keep your files as lightweight and uncomplicated as possible.
Step 3: Create Your Views
In order for Entity Browser to display a media library, you’ll have to create a View display for it, using the Views module. The Entity Browser module comes with a default View when installed ("Media"), so let's build our custom displays inside that view. (admin/structure/views)
To make the editing process as easy as possible, we'll make a separate view display for each media bundle. We'll also limit each view display to a particular media type. This way, an editor is never sees videos or documents in the library when editing an image field, for example. The one exception to all is this is our WYSIWYG. There is only 1 media button available in the WYSIWYG, so we'll use the view display "embeddable browser" and allow all media types here.
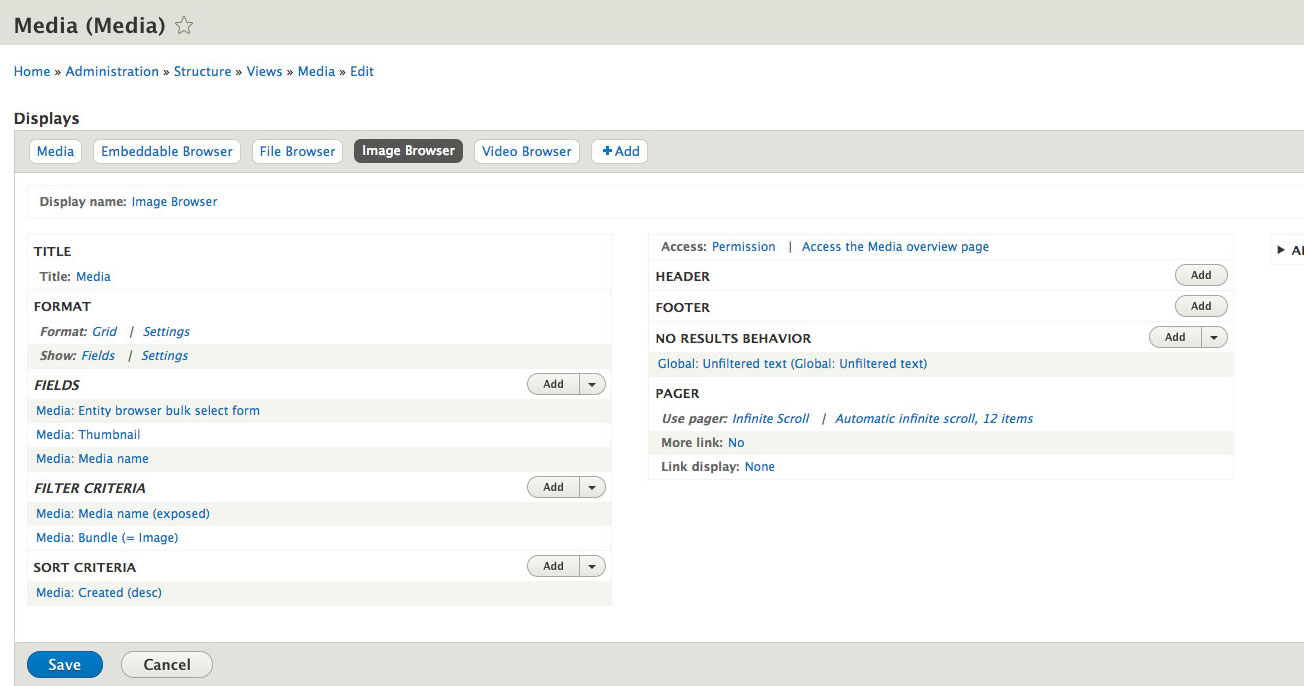
Each view display will be of the entity browser type and will use the same grid format, fields, sort and pager configuration—just the filters will change in order to restrict the media type for field browsers. The embeddable browser view will allow all media but will have an exposed filter for the type. I prefer to use a 4 column grid with views infinite scroll for the pager since the views will be displayed in a modal library. For the fields, I just show a thumbnail and the media name. The only required field is the Entity Browser Bulk Select Form field. This will add a checkbox to each view row that allows the media to be selected. Without the select field your view will be useless.
Step 4: Configure Image Styles
When adding or placing media, editors should have the ability to choose some predefined sizes for their uploads. Having preset sizes helps for consistency and many editors are uploading media direct from the source, and not resizing or cropping beforehand. Drupal's Image Styles has always be the tool of choice for this setup (admin/config/media/image-styles). Once defined, we'll have the option to select an image style as we are placing an image in our content.
I like to create as many image styles as the site design dictates with a few extra for WYSIWYG embedding—as well as a 2x responsive style for each one that is less than 600px wide. 2x styles are used by the responsive images core module to show larger files on retina screens. 600px is a nice rule of thumb for retina functionality because you get sharp images while retaining reasonable file sizes. You might also want to set custom breakpoints in your theme so your image styles switch the at the same screen sizes as your design.
Pro Tip:
It is also recommended to use the Image Style Quality module when setting 2x styles to help reduce file size. The ISQ module allows you to define quality percentages to help reduce file size. Surprisingly, you can set a quality of 40% on a 2x retina style and it will still be sharper than the normal non-retina style without the quality reduction.
Step 5: Manage Your Display Modes
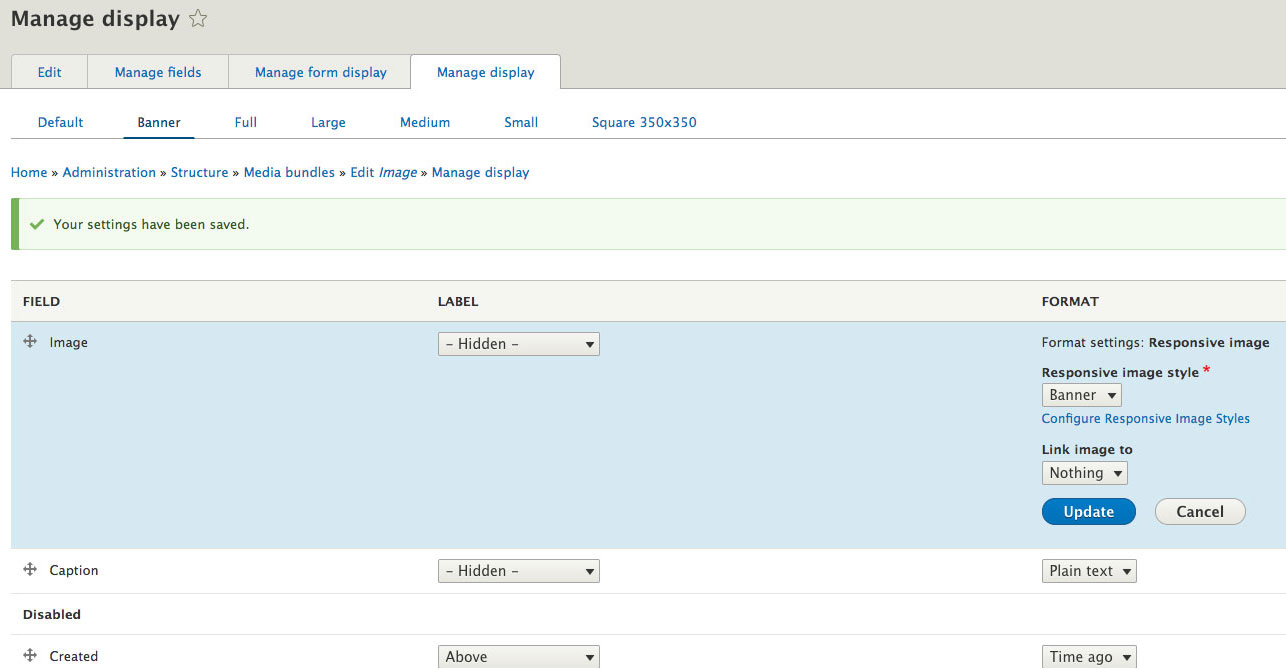
Display modes are the key to Drupal 8 Media’s heart. Because nearly everything in Drupal 8 is an entity, display modes are the best way to define how media is rendered on a case by case basis. These display modes come in two varieties—form modes and view modes. Form modes define the editing experience and view modes define how the content is displayed. We will be concentrating on the view mode portion of display modes. You’ll want to set up a display mode for every image style available to an end user. In the sample screenshot, you can see how I'm defining display modes for "banner, full, large, medium, small, and square 350x350"– these are the current set of Image Styles in this example.
Document and video media bundles also need display modes, but unlike images, we can probably get away with just one view mode for each.
ProTip:
If you plan on embedding media at original sizes in the WYSIWYG, you’ll want to create an extra view mode for it. The Entity Embed module does not recognize ‘Default’ as a usable view mode.
Once view modes are created, they can be enabled on the manage display tab of the media bundles. For an image media bundle, each display should have the image field set to the corresponding image style or responsive image style.
Step 6: Configure Your Entity Browsers
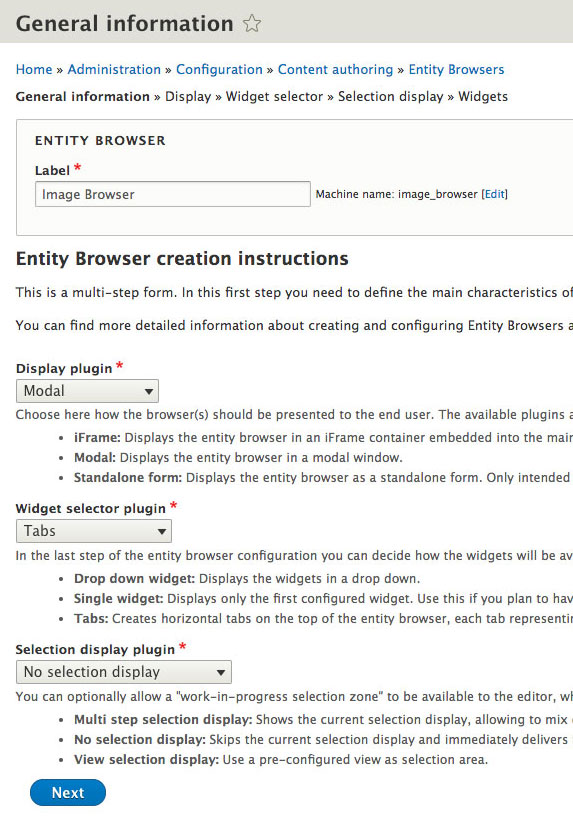
Just like the "Media" View displays we discussed in Step 3, each media bundle needs its own Entity browser (plus one for WYSIWYG embedding). Each browser will be set up almost exactly the same with a few small but key differences (admin/config/content/entity_browser).
Settings – Using a modal display for field-based browsers helps to keep the node edit form clean and having no selection plugin streamlines the editor experience. When using a modal view, using tabs as the widget selector is a handy way to partition the browser functionality. If creating an embeddable browser you must use the iframe display plugin to prevent AJAX errors.
On the display screen you can choose to set a height and width for your modal and the link text that will be shown at the bottom to allow editors to use their selected image. Leave auto open entity browser unchecked for non-embeddable browser. The Inline Entity form module will control how we open field-based browsers. For embeddable media you will want to auto open since entity embed automatically uses a modal to house the browser iframe.
The widget selector screen will always show a no configuration message unless you are using a custom selection plugin and unless you are using the multi-step option for your selection plugin, there will also be nothing to configure on the selection display page.
Widget plugins control the functionality of the entity browser. Each plugin defines a piece of the media browser. The first plugin I use is the browser view that displays the media library. Since I also want editors to be able to upload media right in the modal if they can’t find something they like, I also add an Entity Form widget that uses the form display of the media bundle. This ensures that my custom fields will be available to editors when uploading media. The embeddable entity browser will need to have an entity form plugin for each type of media.
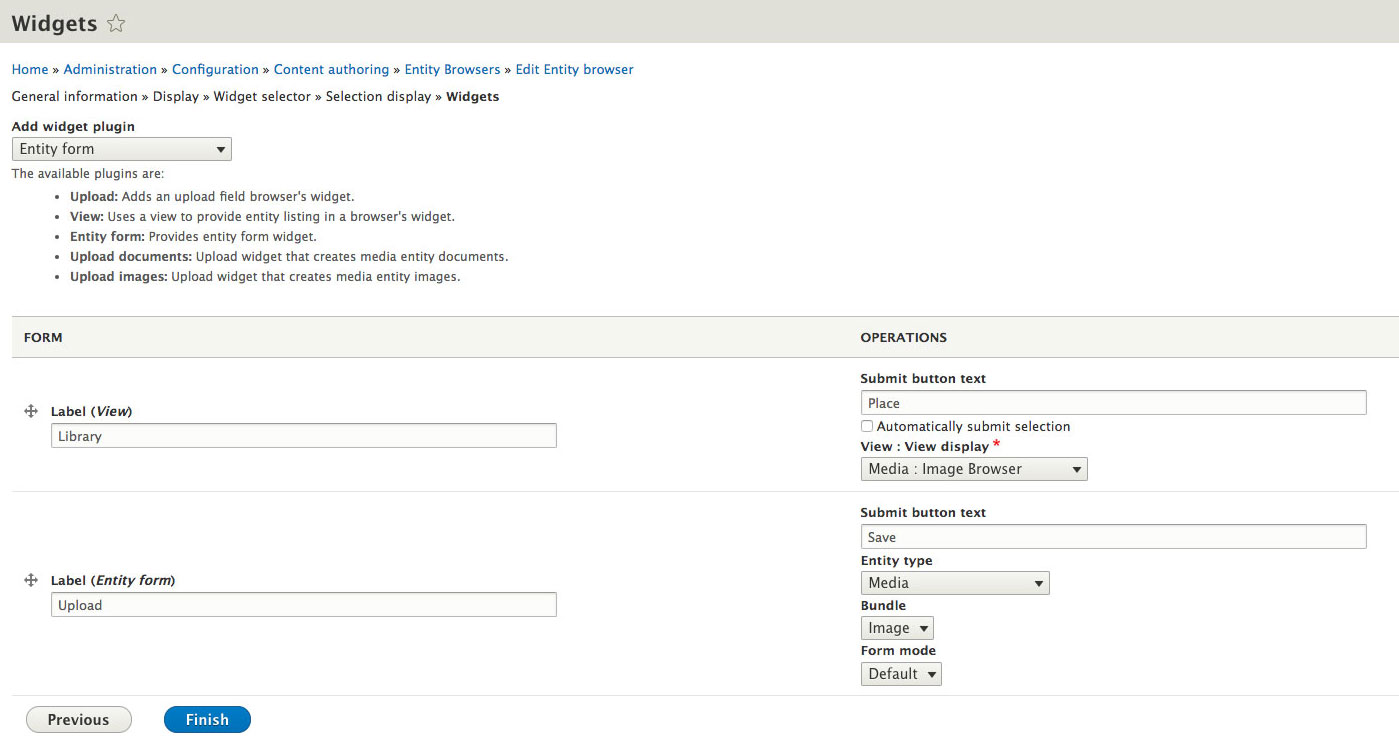
Pro tip:
When using the Entity Form widget, set the entity type to media—not media bundle. This is misleading, but if you use the media bundle option you will get the global media bundle form (for adding new bundles) instead of the form for a specific bundle when adding new media.

Step 7: Edit Content Types
All the pieces are now in place to add a media entity reference field. This will be a new field of type Reference > Content (because media entities are content entities) that we're putting on the Basic Page content type.
Media reference field configuration works the same for Content Types, Paragraphs, Custom blocks and any other fieldable entity.
On the field settings page, the type of item to reference should be 'media'. On the field edit page, the reference type should be the media bundle type you want to display in the field.
On the manage form display page, the field should be set to Inline Entity Form - Complex. Make sure that both the 'allow new' and 'add existing' checkboxes are selected in the settings and that the proper entity browser type is set.
Lastly, set the manage display settings for the field to display the rendered entity and select the display mode for the final output.
Step 8: Set up a Custom Button in the WSIWYG Editor
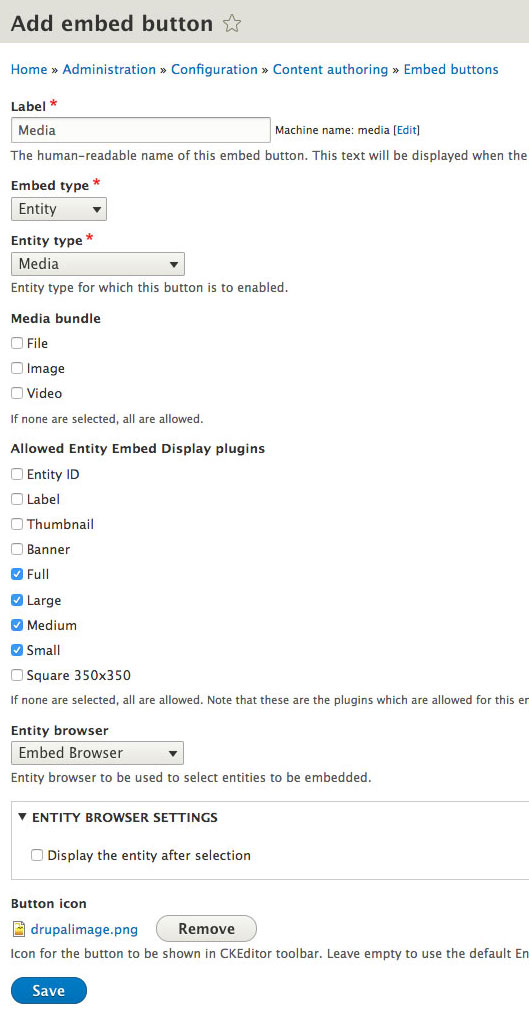
In order to embed media, there needs to be a new CKEditor embed button to reference it (/admin/config/content/embed). Let's do this choosing "add embed button."
Once the button's embed type is changed to 'entity', more options become available–you can select "media" as the entity type, choose the types of media to display, and select the allowed display plugins. Display plugins are the display modes you enabled on the media bundle earlier.
I recommend leaving all the media types blank so all types are allowed, but limiting the allowed display plugins to help keep the look of embedded media consistent. Notice that "default" is not a display option—that's why you need a "Full" display mode if you're planning on displaying images at their original size.
After creating the embed button, it can be added to the CKEditor formats. The new media embed button will be in the row of available buttons and can be dragged anywhere you prefer within the toolbar. I recommend removing the default CKEditor media button once your custom entity button is in place to prevent confusion.
Make sure to check display embedded entities, align images and track images for enabled filters and uncheck caption images if using a custom caption field. The filter processing order should have the three image filters at the top in the same order as their checkboxes appear.
ProTip:
If you are limiting allowed html, you will need to add the following tags into the allowed html tags field in order to allow media:
<figcaption> <picture srcset media type> <iframe src class title frameborder aria-describedby tabindex allowtransparency style> <drupal-entity data-entity-type data-entity-uuid data-view-mode data-entity-embed-display data-entity-embed-display-settings data-align data-caption data-embed-button>
Drupal 8 Media management can be daunting task. What do you really need? What is the best editing workflow? Where is the best folder to store your cat videos? What is your level of site building experience?
With new core minor releases every few months in Drupal 8, there is hope that someday soon media libraries will have a stable place in core and some of those questions will be answered universally. Packaged distributions such as Acquia Lightning can help meet media needs, but in order to get a fully customizable solution tailored to your site, you will need to go it alone.

Join the Discussion +